
Your self-paced guide to teaching with the digital resources on EPS Connect and building student practice with Reading Assistant.
Two platforms you’ll use:
 |
 |
| EPS Connect (teacher instruction) | Reading Assistant (student practice) |
In this guide
1. Quick Start Checklist - Complete these steps to set up and launch Reading Accelerator successfully.
2. How to Use This Guide — The big picture and how the two platforms work together
3. EPS Connect (Teacher Instruction) — Courses, navigation, the Skills Tracker, and manipulatives
4. Reading Assistant (Student Practice) — What it is, best practices, student rollout, and reports
5. Measuring Success: BOY, MOY & EOY Benchmarks — How we measure growth across the year
1. Quick-Start Checklist
To help you get up and running quickly, use the checklist below to complete a few key setup and preparation tasks. Each item will be covered in more detail throughout this guide.
☐ Sign in to EPS Connect at connect.epslearning.com (or via Clever / ClassLink).
☐ Confirm your Reading Accelerator course is assigned to your class.
☐ Open a lesson and explore both the Step-by-Step Script and Lesson Plan views.
☐ Try the Letter Cards and Tile Board, and browse the Resources tab.
☐ Practice capturing a few observations in the Skills Tracker.
☐ Introduce Reading Assistant to students using the intro deck, video, and poster.
☐ Set the goal of 30 minutes of practice per week with each student.
☐ Schedule and administer the BOY Benchmark — then plan for MOY and EOY.
☐ Log in to the Growth Dashboard weekly to review the Benchmark, Progress, and Usage reports.
2. How to Use This Guide
Reading Accelerator is a structured-literacy program that brings together three things that work as one: teacher-directed instruction, independent student practice, and automated assessment. As a teacher, you deliver the instruction; the technology supports your teaching and gives students meaningful practice while measuring their growth.
You will work across two connected platforms:
- EPS Connect — the instruction side. This is where you deliver and track Reading Accelerator lessons, using scripted support, digital manipulatives, and your online Teacher’s Guide and Student Workbooks.
- Reading Assistant — the student-practice side. Powered by our partnership with Amira Learning, it gives students AI-supported oral-reading practice and delivers the assessments that show their growth.
Work through the guide in order the first time, then use it as a reference. The final section gives you a checklist to get started and the contacts you’ll need for help.
At a glance: the two platforms
|
Platform |
What it’s for |
How you reach it |
|
EPS Connect |
Delivering and tracking Reading Accelerator instruction — lesson scripting, digital manipulatives, Teacher’s Guide and Student Workbooks. |
Sign in at connect.epslearning.com (or via Clever / ClassLink) |
|
Reading Assistant |
Independent oral-reading practice with an AI tutor (Amira), plus the automated Benchmark assessments that measure growth. |
Launched for students through their Reading Assistant app in Clever or ClassLink dashboard. |
3. EPS Connect (Instruction)
EPS Connect is the digital platform that supports you in delivering and tracking Reading Accelerator lessons. It is a digital complement to your Reading Accelerator print materials, giving you online access to enhanced lesson scripting, digital manipulatives, and both the Teacher’s Guide and Student Workbooks in one place.
Logging in
- Go to connect.epslearning.com and enter your username and password.
- Depending on your district, you may sign in through Clever or ClassLink instead — use whichever method your district has set up.
Adding courses to your classes
Your Reading Accelerator content is delivered to students through your classes. A course must be assigned to a class before it appears for you and your students, so start by confirming your classes are set up (rostered) for the year.
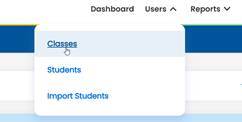
- Confirm your roster/classes are in place. Your classes and students should already be set up for the school year before courses are assigned. To view your classes go to Users > Classes
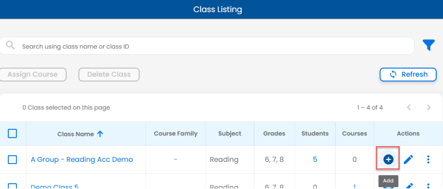
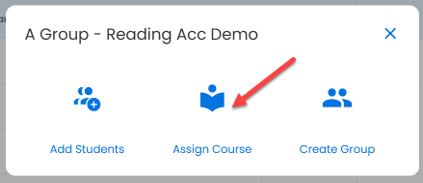
- Choose Add on the right class. Click the Add (blue plus) button next to your class and choose “Assign Course” on the next pop-up menu.
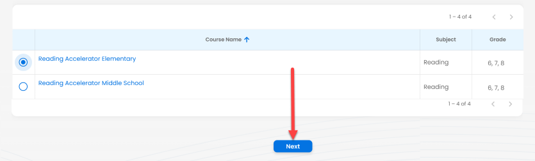
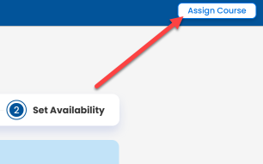
- Choose your Course and Save. Select your course, choose Next, and then click Assign Course at the top-right of the page.
- Confirm the course shows up for the class — once it does, your lessons appear on your Dashboard laid out in their systematic progression, with the next lesson queued up for you.
Not seeing your course? If a Reading Accelerator course doesn’t appear, it usually hasn’t been assigned to your district or class yet. Check with your district administrator or reach out to EPS Support (contacts on the bottom of this page).
Navigating a lesson: Lesson Plan vs. Step-by-Step
Every Reading Accelerator lesson has Parts A and B and follows a consistent five-step routine (for example, Step 1 is the Sound Round and Step 2 is the Rapid Round). When you open a lesson, you can toggle between two views using the tabs in the upper-right corner. They contain the same lesson — the difference is how much support is shown.
- A fully scripted, word-for-word view that walks you through the lesson so you can teach it with fidelity.
- Shows the timing for each step to help you pace the lesson.
- Color-coded so it’s easy to follow: what you say appears in blue, and what students should say in response appears in black.
- Best when you’re newer to Reading Accelerator or want the extra structure and scripting.
Lesson Plan
- Mirrors the layout of the printed Teacher’s Guide, without the full word-for-word scripting.
- A cleaner, more streamlined view for when you’re comfortable with the instructional routines.
Tip: Start in the Step-by-Step Script while you learn the routines, then switch to the Lesson Plan view as you gain confidence. You can toggle back and forth at any time.
Using the Skills Tracker
The Skills Tracker gives you formative data on how students are responding to the lessons you deliver. You capture quick observations right inside the lesson, and Reading Accelerator turns them into a report you can use for planning, conferences, and data meetings.
-
Capture observations during the lesson
- As you teach or circulate, click the Skills Tracker icon (a paper icon with a checkmark) in the blue banner at the top of the lesson.
- For each student, tap a status: Not Set (e.g., absent), Lagging (may need reteaching or extra support), Making Progress (yellow flag), or On Track (green flag).
- Close the tracker when you’re done. These in-lesson marks are what populate your Skills Tracker report.
- Review and save the report
- From the Dashboard, click the Skills Tracker button. It opens to your whole class by default.
- Click the Students tab to see individual students, then select a student to open their report.
- Check the “Hide untaught skills” box to focus on what’s been taught.
- To keep a copy, use your browser to Print or choose Save as PDF — handy for student data folders, conferences, and data meetings. Always follow your district’s protocols for storing student data.
Why it matters: The Skills Tracker gives you an at-a-glance picture of who is on track and who may need reteaching, so you can group and support students with confidence.
Manipulatives — in the lessons and in the Resources tab
Reading Accelerator includes digital manipulatives built right into the lessons (available only in EPS Connect), so there’s no materials prep. You’ll also find everything gathered in one place under the Resources tab.
Built into the lessons
- Letter Cards — used to review previously learned sounds. Find them in Step 2: Rapid Round > Skill Review. The cards for the day are already stacked and ready — no prep needed. Use the Present icon and choose “Present on New Window” to display them on a second screen or board, and Flip to show the front and back of a card.
- Tile Board — an Orton-Gillingham-based manipulative that helps students visualize phonics and decoding through letter tiles and word markups. Find it in Step 2: Rapid Round > Skill Introduction. The Show / Hide Markups option lets you reveal the correct markups in advance (helpful if you’re not a trained reading interventionist), then hide them before you work through the word with students.
The Resources tab
- Click the Resources button on your Dashboard for on-demand access anytime.
- Inside you’ll find all of the digital manipulatives, plus a digital Student Workbook (which opens as a flipbook) and the digital Teacher’s Guide.
4. Reading Assistant (Student Practice)
What Reading Assistant is
https://support.epslearning.com/getting-started-with-reading-assistant
At its heart is Amira, an intelligent reading tutor. Students read aloud, and Amira listens and gives real-time, corrective feedback — using speech-recognition technology similar to Siri or Alexa. She does four things:
- Listens to your student read aloud.
- Assesses continuously, tracking skills across domains like vocabulary, background knowledge, phonological awareness, decoding, and fluency.
- Tutors in the moment, delivering personalized “micro-interventions” (60+ of them, grounded in the science of reading) at the highest-leverage moments — she doesn’t interrupt every error.
- Reports back, providing easy-to-interpret reports, running records, and a recording of every story a student reads.
EPS has loaded Reading Accelerator content — including 50+ decodable passages — onto the platform. That means students practice the same passages they meet in your lessons, and Reading Assistant provides the practice and automated assessment that complete the Reading Accelerator model.
Best practices
Aim for a minimum of 30 minutes per week. Research shows students’ reading fluency accelerates when they read with Reading Assistant for at least 30 minutes a week — roughly three reading sessions of 10 minutes, or about two stories a day. This dosage is the goal to set with every student.
- Help Reading Assistant hear. Have students face their devices in different directions (a “compass” facing inward) rather than side by side, and coach them to wait for the green mic before they begin reading.
- Build a device routine. Keep only Reading Assistant open, and restart devices about once a week.
- Choose a classroom model. Small Group (a reading station) is the most common; Whole Group and Individual (WIN/“What I Need” time, before/after school, or homework) also work well.
- Don’t help during assessments. Assistance during a Benchmark affects where students are placed — let them do their best independently.
- Keep the setup simple. No special equipment is required — just a computer or tablet with sound and microphone on. Headphones with mics are optional but can help in noisy rooms.
How to introduce it to your students
Reading aloud to an AI tutor is new for most students, so a slow, intentional rollout pays off. Build your introduction around three ideas: introduce Reading Assistant, create routines, and set up your space.
- Use the ready-made resources. EPS provides student-introduction slide decks (one for PreK–Grade 4 and one for Grades 5–8), an introduction video, lesson plans, and a printable classroom poster.
- Model it explicitly. Play the intro video, or write a sentence on the board and role-play reading aloud — make a “mistake,” then switch roles to be Amira and give an intervention. Make sure students understand why this practice matters.
A sample first week
- Day 1: Introduce Reading Assistant, set reading expectations, and model how to use it.
- Day 2: Review expectations, model again, and let students practice.
- Day 3: Administer the Foundational Skills (Benchmark) Assessment.
The student’s first session
- Press the green “Let’s do it” button.
- Click “Allow” when prompted for microphone access.
- Click “Read a story.”
- Read the full story — receiving coaching as needed.
Good to know: On a student’s very first login, Reading Assistant automatically runs a quick sound-and-microphone check — you don’t need to assign it.
Need extra support? Practice logging in and reading in small, supervised groups; “train” a few expert students to become your troubleshooting helpers; and recruit older-grade or parent volunteers to lend a hand.
Understanding the reports
https://support.epslearning.com/reading-assistant-reports-and-assessments
Your home base is the Growth Dashboard — log in weekly to keep an eye on progress. Three reports will do most of the work for you:
|
Report |
What it shows |
How to use it |
|
Results from the most recent Benchmark assessment across metrics (ARM = Amira Reading Mastery grade-level equivalent; Oral Reading Fluency = words correct per minute), with percentiles and comparison to national norms. |
See where each student stands and how the class compares to national norms. Note: results may take a few days if a human scorer is needed. |
|
|
A per-student view of growth over time. Every story is recorded with a scored transcript you can listen to and review. |
Play recordings for conferences or MTSS meetings, track growth, and override the scoring if you disagree (which also helps train the tutor). |
|
|
A weekly snapshot of engagement: tutoring time, stories read, instructional minutes, completed activities, and badges earned. |
Spot students who need encouragement, confirm the 30-minute goal is being met, and award badges/certificates to motivate. The weekly goal resets Sunday night. |
Also worth knowing: Reading Assistant includes additional reports you can grow into — such as the Class Progress, Skills Status, Skills Diagnostic, Reading Risk, and Parent reports — when you’re ready to dig deeper.
5. Measuring Success: BOY, MOY & EOY Benchmarks
This is how we measure success in Reading Accelerator. The Benchmark assessments given at the Beginning of Year (BOY), Middle of Year (MOY), and End of Year (EOY) are the primary way we measure student growth. They are the most thorough assessment in Reading Assistant, and the reporting built from them is what shows the progress your students make across the year. Every teacher using Reading Accelerator should plan to give all three.
What the Benchmark measures
The Benchmark is a single, efficient assessment (about 15 minutes) that gives a rich picture of each student as a reader. In English and/or Spanish, it looks at oral reading fluency, phonemic awareness, decoding, spelling and encoding, vocabulary, and dyslexia risk. Amira proctors it, so there’s no scoring or interpretation required from you. It produces an ARM score (a grade-level equivalent) and a percentile rank for each student.
The three testing windows
|
Window |
When |
Purpose |
|
BOY |
Beginning of the year |
Establishes each student’s starting point and places them at the right level for practice. Give it early — after you’ve modeled Reading Assistant and students have had one or two practice sessions. |
|
MOY |
Middle of the year |
Checks growth at the midpoint so you can adjust instruction and support. |
|
EOY |
End of the year |
Captures end-of-year growth and lets students “show what they know.” |
Preparing and administering a Benchmark
- Know who schedules it. Districts often schedule the three windows for everyone. If yours doesn’t, you can assign it yourself from the Growth Dashboard: open the ISIP Assess Status widget, click the calendar, and choose the correct testing window — it takes only a few clicks.
- Set the language first. In Settings > Assessment Settings, set each student’s assessment language (English, Spanish, or both) before testing.
- Introduce Reading Assistant before BOY. Model it and give a practice session or two so the assessment feels familiar — and remember not to help students during the assessment itself.
- Allow lead time. Results may take a few days if a human scorer is needed.
- Check completion using the ISIP Assess Status tile, which shows each student’s status.
Reading the results across the year
The Class Progress Report brings the BOY, MOY, and EOY results together in one view, showing each student’s ARM score and percentile rank so you can see growth over time. Scores are color-coded by percentile: red (24th percentile or below), yellow (25th–74th), and green (75th or above).
The bottom line: Consistent BOY → MOY → EOY data is how you, your school, and EPS see the impact of Reading Accelerator and identify which students need more support. Plan for all three from the start of the year.
Support - Where to get help
- EPS Technical Support: support@epslearning.com · 1-800-225-5750
- In-app help: Chat with Amira right inside Reading Assistant for quick troubleshooting.
- Your EPS Customer Success team: Reach out anytime for coaching, resources, and implementation support.
You’ve got this — welcome to Reading Accelerator.