Here are several tips and strategies to support Step 3: Word Building, with a focus on effectively using and organizing magnetic boards and letter tiles. SPIRE Magnetic Letter Tiles are organized by color
| WHITE | GREEN | YELLOW | BLUE | PURPLE |
| Consonants | Vowels | Exceptions | Suffixes | Prefixes |
Grouping Letters. You will have a package of letter tiles for every magnet board purchased. When you separate the letter tiles, group all of the same letter(s) together. For instance, if you have seven (7) tiles of the consonant team “sh,” keep them together until it’s time to put them on the student magnet boards.
Storage. Storage and organization is key. Many teachers use plastic storage containers with dividers or ziplock bags to hold tiles. Other creative ways to store tiles are tackle boxes and craft containers. One example from a teacher:

-
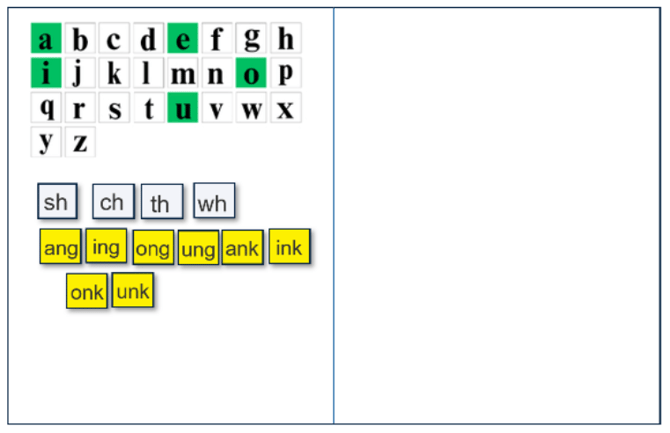
The letters of the alphabet go on the magnet boards immediately. Place them in alphabetic order on the left side of the students’ magnet boards.
-
When you are ready to teach a new concept, take those tiles out of your storage and place them on each student’s magnet board. The new tile will now remain on each of the student’s board for all future lessons.
-
When the student gets to Level 3, the alphabet tiles must be doubled to allow students to build multisyllabic words
Tiles by Level
|
Color Letter Tiles Per Level |
|
|
1 |
White: b, c, d, f, g, h, j, k, l, m, n, p, q, r, s, t, v, w, x, y, z, sh, ch, th, wh |
|
2 |
Everything from Level 1 and... |
|
3 |
Everything from Level 1-2 and... |
|
4 |
Everything from Level 1-3 and... |
|
5 |
Everything from Level 1-4 and... |
|
6 |
Everything from Level 1-5 and... |
Getting Started with the Student Manipulative Board
Level 1
- Beginning of Level: Place letters a-z in alphabetical order on the left side of each student's board. These letters should always remain on the magnetic boards. Organize additional letter tiles in a bag or drawer
- End of Level: The level ends with the phonogram tiles that have been mastered throughout the level.
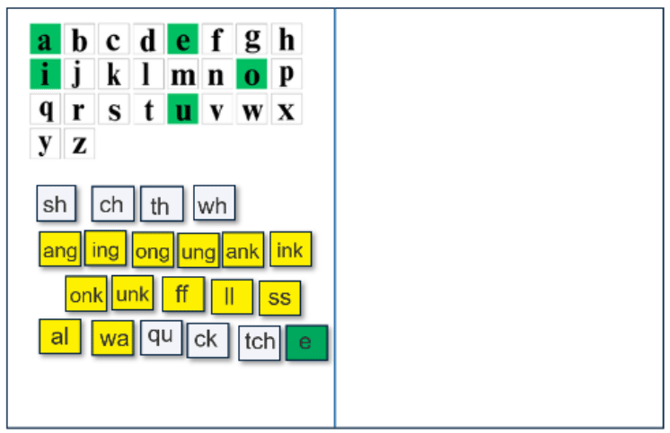
Level 2
- Beginning of Level: Add letter tiles for the new concepts that are taught for the first lesson on the right side of the board. Organize additional letter tiles in a bag or drawer.
- End of Level: The level ends with the phonogram tiles that have been mastered throughout Levels 1 and 2.
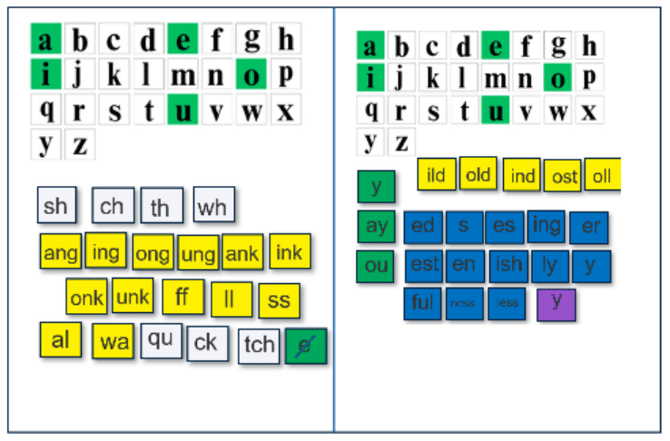
Level 3
- Beginning of Level: Add letter tiles for the new concepts that are taught for the second lesson of this level as students will already have the tiles needed for the first lesson . Organize additional letter tiles in a bag or drawer.
- End of Level: The level ends with the phonogram tiles that have been mastered throughout Levels 1-3.
Level 4
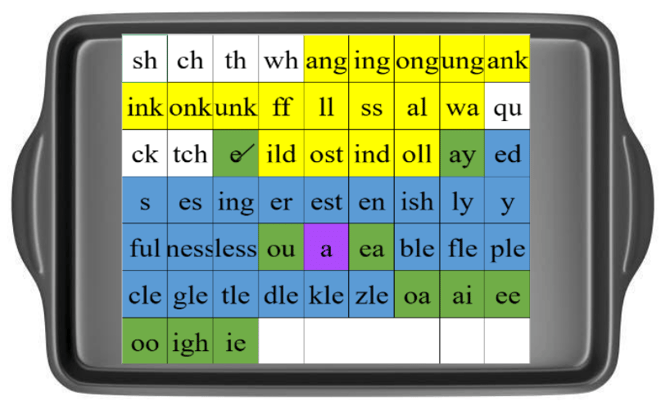
Once you reach Level 4, your magnetic board may not hold all tiles. A great suggestion would be to use the template below with a magnetic tray (for example, a cookie sheet) that is big enough to hold the additional tiles from higher levels.
Levels 5 and 6
