This article provides step-by-step instructions for setting up and using the iSPIRE learning program. It covers creating teacher accounts, setting up classes, adding students, assigning lessons, and setting up student accounts. It also includes essential tips and links to related articles and support resources.
Teacher Quick-Start Guide
Teacher Account and Logging In
If your account has been set up and you have a login
- Go to https://app.exploros.com/login
- Select a login option, or enter your Username and Password, then click Log in.
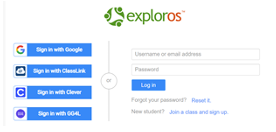
- You are now at your home screen.
If you do not have a teacher account and login set up
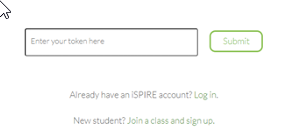
- Go to www.exploros.com/ispire
- Enter the Token you received from EPS in the token field, and click Submit.
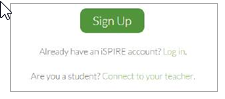
- Select the green Sign Up button.
- Check the box to accept the privacy policy.
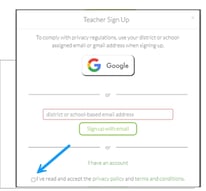
- Select Sign up with email and use your school-issued email address to sign up for your teacher or district/school admin account.
- You will then receive an email from Exploros to finish the account setup. Open that email and click Get Started.
- Enter your name and password on the Welcome page (note: your username will be your email address). Click Create account.
- You will be brought to the next screen stating that your account has been successfully created.
- Click Login, first ensuring that you are using Chrome or Safari as your browser.
- You are now at your iSPIRE teacher account home screen and will be prompted to create a class to get started.
Creating a New Class and Adding Students
A Class is defined as a set of students working together within a level of iSPIRE on the same lesson.
- You will be prompted to Create New Class.
- Give your new class a title that is specific to this iSPIRE Group (e.g., Period 4).
- Click Create Class.
- Enter Class Details by selecting Grade and Subject from the drop-down menus. iSPIRE will show up under Licenses; click Next.
- Back on your homepage, a green message will prompt you about adding students. Click add students now.
- Click Import Students and in the text box, enter one student per line using this format: first name, last name, username, password
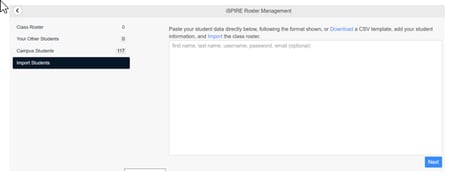
Teachers assign the username and password for their students. We recommend using the students email address as the username to ensure it is unique
- Click Next after all students in that class have been entered.

- After reviewing the information, click Next again, or Back to make changes.
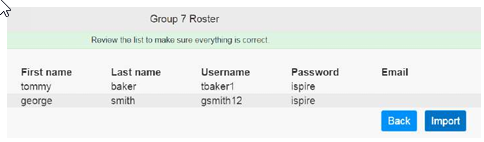
- Click Import. These student accounts will be created and added to your class.
- Click Email to me to save your roster with passwords.
Adding Another iSPIRE Class
- Return to your home page.
- Click the drop-down menu in the top left corner of the screen.
- Click the + button to the right of CLASSES, and follow the steps above.
Managing an Existing Class Roster
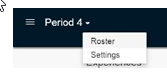
- Click a Class to view (e.g., Period 4).
- In the drop-down menu next to the Class, select Roster.
- In the Class Roster tab, you can view details, remove a student from the class, and change passwords.
- Click on a username to change a password.
- To add more students, follow the Import Students steps above.
Assigning a Lesson to a Class
- In the Class you wish to assign a lesson to (e.g., iSPIRE Group 3), click the blue + button located to the far right of Experiences.

- In the Library, navigate to the appropriate level and lesson number of iSPIRE for this group based on the results of the Placement Test.
- Click to enter the lesson folder, then choose the correct Experience (Pre-Test, Introductory Lesson, Reinforcing Lesson, etc.) and click the blue Assign button.
- Step 1: Set Time — choose your End Date and time.
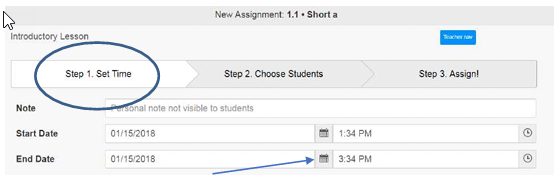
When assigning a lesson, it is recommended you push out the end date — the default is two hours from the time you assign it — unless you are certain you will complete the entire lesson and have time to review student work in that timeframe.
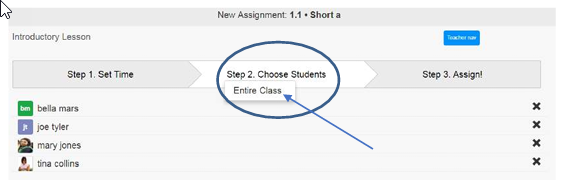
- Step 2: Choose Students — select Entire Class to add all of your students to this assignment.
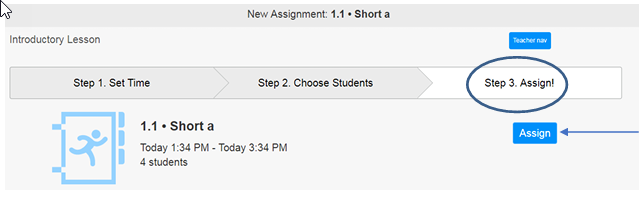
- Step 3: Assign! — click the blue Assign button to push this lesson to your students’ accounts.
- If desired, repeat these steps to assign the Independent Work experience for this lesson before returning to your home screen.
You will be directed back to your Class’s home screen (e.g., Period 4), where the lessons you just published appear under Assigned Experiences.

Beginning and Ending a Lesson
- Click on the lesson under Active Experiences on your home screen and have students do the same on their device/in their account.
- Once a lesson is completed, click the blue End Now button on any Assigned lesson on your home screen. The experience will then be moved to Ended Experiences.
See iSPIRE Lesson Flow and Tips in the Class Pack for more information on navigating through and teaching a lesson.
To prevent your student devices from going to sleep during teacher instruction time, you should extend the screen auto-lock time to 15 minutes or longer.
Tip: If a student iPad goes to sleep, the student will need to refresh the page or even log in again to re-sync their device with the teacher’s device.
Program Assistance and Technical Support
Several documents are housed in the Help section, as well as in the Class Pack, including directions for getting started, how to use the platform and program, and other FAQs.
For further support, please contact Technical Support at support@epslearning.com
Phone: 800.225.5750